Glass Sculpting: A Guide to the Art of Sculpting in Glass
Glass sculpting is an intricate art form that involves the manipulation of molten glass to create stunning and delicate sculptures. This article serves as a comprehensive guide, providing valuable insights into the techniques, tools, and processes involved in this unique craft. By exploring the case study of renowned glass sculptor Amanda Smith, we will delve into the fundamental principles of glass sculpting and examine the artistic nuances that make it a captivating medium.
Amanda Smith’s journey exemplifies the transformative power of glass sculpting. From her humble beginnings as an aspiring artist with minimal knowledge of this particular craft, she honed her skills through rigorous practice and experimentation. Through dedication and relentless pursuit of perfection, Smith developed a distinct style characterized by fluid lines and dynamic forms in her glass creations. Her success not only speaks to her individual talent but also highlights the limitless possibilities inherent within glass sculpting.
This article aims to demystify the process behind creating these awe-inspiring pieces of artwork while offering practical guidance for those interested in venturing into this realm themselves. We will discuss essential tools such as blowtorches, kilns, molds, and various shaping instruments used in manipulating molten glass effectively. Additionally, we will explore different types of glass suitable for sculpture work and delve into advanced techniques such as fusing, slumping, and casting.
Fusing is a technique that involves melting together multiple pieces of glass to create a unified sculpture. This method allows for the incorporation of various colors, textures, and patterns into the final piece. Slumping, on the other hand, involves shaping molten glass by placing it over or inside a mold and allowing it to take on the desired form as it cools. Casting is another advanced technique where molten glass is poured into a pre-made mold to create intricate three-dimensional shapes.
Throughout this article, we will provide step-by-step instructions accompanied by visuals to help aspiring artists understand the process better. From gathering materials and preparing the workspace to shaping, annealing, and finishing the sculpture – every stage of creating a glass sculpture will be covered in detail.
Furthermore, we will address safety precautions and best practices to ensure a secure working environment when dealing with hot glass. Safety goggles, heat-resistant gloves, and proper ventilation are just a few examples of essential safety measures that should never be overlooked.
By examining Amanda Smith’s artistic journey alongside practical advice and expert insights, readers will gain both inspiration and knowledge necessary for exploring their own potential in the world of glass sculpting. Whether you are an experienced artist looking to expand your repertoire or an enthusiastic beginner ready to embark on an exciting creative adventure, this guide will serve as an invaluable resource to help you navigate through the mesmerizing realm of glass sculpting.
History of Glass Sculpting
Glass sculpting is an art form that has a rich and fascinating history. Dating back thousands of years, the origins of glass sculpture can be traced to ancient civilizations such as Mesopotamia and Egypt. One captivating example is the famous “Portland Vase,” a Roman cameo glass vessel from the 1st century AD. This artifact showcases intricate scenes carved into layers of colored glass, demonstrating the skill and craftsmanship of early glass artists.
Throughout history, various cultures have embraced glass sculpting as a means of artistic expression. In medieval Europe, stained glass windows adorned cathedrals with their vibrant colors and mesmerizing designs. The delicate process involved in creating these masterpieces required exceptional precision and attention to detail.
Over time, advancements in technology and techniques further expanded the possibilities within this art form. Today, contemporary artists push boundaries by experimenting with unconventional materials, incorporating mixed media elements into their sculptures, and exploring innovative methods for manipulating glass.
To fully appreciate the impact of glass sculpture on both historical and modern contexts, consider the following emotional response-evoking bullet points:
- The fragile beauty: Glass sculptures possess an ethereal quality that captures light in unique ways, evoking feelings of wonder and enchantment.
- Skillful craftsmanship: Artists spend countless hours honing their skills to transform molten glass into breathtaking works of art, which highlights dedication and passion.
- Captivating aesthetics: From sleek minimalist forms to intricately detailed compositions, each piece tells its own story through shape, color, texture, and transparency.
- Timelessness: Glass sculptures transcend time and cultural barriers; they hold immense value not only as decorative objects but also as meaningful expressions of human creativity.
In addition to these emotional aspects associated with glass sculpting’s history and appeal, it is essential to understand some technical aspects related to tools and materials used in this art form. Therefore, let us delve deeper into the necessary equipment required for glass sculpting.
Tools and Materials for Glass Sculpting
The art of glass sculpting offers a boundless realm for artistic expression, enabling artists to create intricate and captivating works that push the boundaries of creativity. To truly appreciate this art form, one must delve into its various techniques and possibilities. Let us explore some fascinating aspects that make glass sculpting an extraordinary craft.
Imagine a skilled glass sculptor meticulously working on a life-sized representation of a dolphin leaping out of the water. The artist carefully manipulates molten glass with precision and finesse, skillfully capturing every detail—the sleek curves of the body, the graceful arch in mid-air, and even the spray of water droplets frozen in time. This exemplary piece not only showcases the remarkable artistic talent required but also highlights how glass can be transformed into awe-inspiring sculptures.
To embark on such creative endeavors, aspiring glass sculptors need to familiarize themselves with essential tools and materials. Here are four key elements necessary for successful glass sculpting:
- A high-quality blowtorch or kiln for heating and shaping the glass
- Various types of specialized pliers, tweezers, and shears to manipulate molten glass
- Protective gear like heat-resistant gloves, goggles, and aprons to ensure safety
- Different types of colored pigments or powders to add vibrant hues to creations
Moreover, understanding different types of glasses is crucial when planning a sculpture. Each type possesses unique properties that influence its behavior during heating and cooling processes. Consider these three common types used in glass sculpting:
| Type | Characteristics | Common Applications |
|---|---|---|
| Borosilicate | High resistance to thermal shock | Scientific equipment |
| Soda-lime | Easy workability | Stained glass windows |
| Lead crystal | Excellent clarity | Fine decorative objects |
Aspiring artists should experiment with these materials and tools, combining their technical knowledge with artistic intuition to breathe life into their creations. By mastering the various techniques of glass sculpting, they can unlock a world of endless possibilities.
With an understanding of the fundamental tools, materials, and different types of glass used in this captivating art form established, it is now time to delve deeper into the basic techniques for glass sculpting. Through these techniques, artists can bring their imaginative visions to life on this delicate medium.
Basic Techniques for Glass Sculpting
In the previous section, we explored the essential tools and materials required for glass sculpting. Now, let us delve into the basic techniques that will enable you to create stunning works of art.
To illustrate these techniques, consider a hypothetical scenario where an aspiring glass sculptor wants to create a sculpture of a flower. The first step in this process is to gather all the necessary tools and materials mentioned earlier: glass rods or tubes, a torch, kiln, tweezers, graphite paddle, and shaping tools.
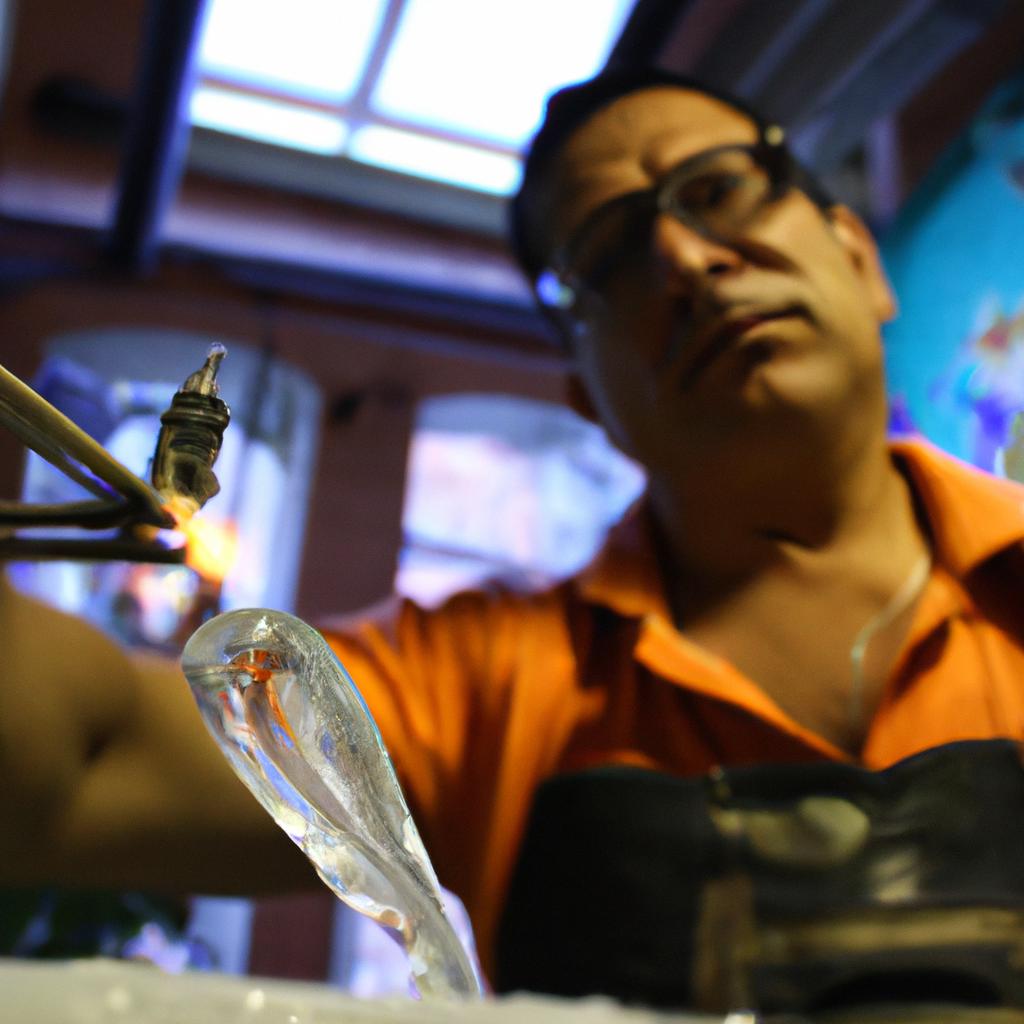
Once equipped with the necessary items, the artist can begin by heating the glass rod using a torch until it reaches a malleable state. Using tweezers or other shaping tools, they can then manipulate the molten glass to shape petals for their flower sculpture. This requires careful control of temperature and precise movements to achieve desired shapes and details.
Next, the artist places each petal in a preheated kiln to anneal them—a crucial step that ensures durability and prevents cracking due to thermal stress. After annealing, the petals are reheated one by one before being joined together through careful manipulation with shaping tools. Finally, additional details such as stamens or leaves can be added using colored glass rods or frits.
Creating beautiful glass sculptures involves mastering fundamental techniques while allowing room for creativity. Here are four key aspects to keep in mind during your journey:
- Patience: Glass sculpting demands patience as working with hot glass requires time and precision.
- Precision: Attention to detail is essential when manipulating molten glass; even minor adjustments can significantly impact the final result.
- Adaptability: Being flexible allows artists to adapt their techniques based on various factors like thickness of glass or desired outcome.
- Experimentation: Trying new approaches and experimenting with different materials can lead to unique artistic expressions.
Additionally, refer to this table below showcasing some common tools used in glass sculpting:
| Tool | Purpose |
|---|---|
| Torch | Used to heat and shape the glass |
| Kiln | Necessary for annealing the finished piece |
| Tweezers | Aid in manipulating molten glass |
| Graphite paddle | Helps with shaping and smoothing surfaces |
By embracing these techniques and principles, you can embark on your journey as a glass sculptor.
[Transition sentence into the subsequent section about “Advanced Techniques for Glass Sculpting”] With a solid foundation in basic techniques established, it is time to explore more intricate methods of glass sculpting.
Advanced Techniques for Glass Sculpting
Building upon the basic techniques explored in the previous section, this segment will delve into intermediate-level glass sculpting methods. It is essential to master these techniques before venturing into more advanced practices. By understanding and implementing these intermediate techniques effectively, artists can elevate their creations to new heights of intricacy and artistic expression.
One example of an intermediate technique involves the creation of textured surfaces on glass sculptures. This technique adds depth and visual interest by manipulating the surface of the glass through various tools and methods. Artists may utilize sandblasting or engraving techniques to etch intricate patterns onto the glass surface, resulting in a captivating interplay between light and texture.
- Incorporating color gradients within a sculpture using frits or powders.
- Utilizing heat manipulation to create unique shapes through slumping or bending.
- Experimenting with multiple layers of glass to achieve dimensionality.
- Employing cold working methods such as grinding and polishing for refined finishes.
In addition to exploring intermediate techniques, it can be helpful to study different approaches used by renowned glass sculptors. The table below showcases three influential artists known for their contributions to the field:
| Artist | Style | Notable Works |
|---|---|---|
| Dale Chihuly | Organic Forms | “Chandelier” series |
| Karen LaMonte | Figurative | “Reclining Dress Impression with Drapery” |
| Bertil Vallien | Abstract | “Fishwife’s Dream” |
By examining the works of these prominent figures, aspiring glass sculptors gain insight into varied styles and inspirations that can inform their own artistic journeys.
As we conclude our exploration of intermediate techniques, let us now turn our attention to the crucial aspect of safety precautions in glass sculpting. With the foundation established by these intermediate techniques, it is imperative to prioritize the well-being of both artist and artwork alike.
[Transition into subsequent section on Safety Precautions in Glass Sculpting]
Safety Precautions in Glass Sculpting
Glass sculpting is a versatile art form that offers endless possibilities for creative expression. In this section, we will delve into various techniques that can elevate your glass sculptures to new heights. Let us begin by exploring the fascinating world of fusing and slumping.
One technique widely used in glass sculpting is fusing, which involves melting multiple pieces of glass together at high temperatures. This process allows artists to create intricate designs by layering different colors and textures. For instance, imagine a sculpture depicting a vibrant underwater scene with shimmering fish and coral reefs. By carefully arranging colored glass fragments on a base piece and subjecting them to controlled heat, you can bring this mesmerizing vision to life.
Another technique worth exploring is slumping, which involves shaping heated glass over or inside molds to achieve desired forms. Imagine creating an elegant vase with fluid curves or a delicate figurine full of grace and movement. Through the strategic placement of molten glass onto custom-made molds, you can transform simple shapes into captivating works of art.
To further ignite your creativity as a glass sculptor, consider the following:
- Experiment with combining different types of glass, such as transparent, opaque, iridescent, or dichroic varieties.
- Explore incorporating other materials like metal wire or ceramic elements into your sculptures for added texture and visual interest.
- Don’t be afraid to break free from traditional forms; let your imagination guide you towards unconventional shapes and structures.
- Seek inspiration from renowned glass artists through books, galleries, or online platforms – their innovative approaches may spark fresh ideas for your own creations.
In addition to these techniques, mastering proper safety precautions while working with hot glass is crucial. The table below outlines essential safety measures every aspiring glass sculptor should adhere to:
| Safety Precautions | Description |
|---|---|
| Use protective eyewear | Shield your eyes from glass shards and intense heat during the sculpting process. |
| Wear heat-resistant gloves | Protect your hands from burns caused by hot glass or contact with heated surfaces. |
| Ensure proper ventilation | Work in a well-ventilated area to minimize exposure to potentially harmful fumes released during heating processes. |
| Have a fire extinguisher nearby | Be prepared for emergencies, ensuring you have easy access to a fire extinguisher at all times. |
By mastering these techniques and prioritizing safety, you can unlock limitless possibilities in the realm of glass sculpting.
Transition into subsequent section: When it comes to showcasing the beauty of glass sculptures, understanding how to effectively display them is paramount. Let us now delve into valuable insights on presenting your masterpieces with elegance and finesse.
Tips for Displaying Glass Sculptures
Having covered the essential safety precautions in glass sculpting, it is now important to explore effective ways of displaying these unique art forms. One notable example that showcases the impact of proper display techniques is the renowned artist, Jane Stevens, whose captivating glass sculptures have gained international recognition.
Display Techniques for Glass Sculptures
To effectively showcase your glass sculptures and enhance their aesthetic appeal, consider implementing the following tips:
-
Lighting: Proper lighting can dramatically enhance the visual impact of a glass sculpture. Use spotlights or track lighting to highlight specific areas or features of your artwork. Experiment with different angles and intensities to create shadows and reflections that add depth and dimension to your sculpture.
-
Background: The background against which you display your glass sculptures can significantly influence how they are perceived by viewers. Opt for neutral colors such as white or black to ensure that the focus remains on the intricate details of your artwork. Avoid busy patterns or distracting elements that may divert attention away from the sculpture itself.
-
Placement: Consider where you will be placing your glass sculpture within a room or gallery space. Take into account factors such as natural light sources, traffic flow, and visibility from various angles. Placing your sculpture at eye-level allows viewers to appreciate its intricacies more easily.
-
Grouping: Creating an arrangement of multiple glass sculptures can evoke a powerful emotional response in viewers. Grouping pieces together based on theme, color palette, or size creates a visually cohesive display that adds interest and intrigue. Experiment with different combinations until you find an arrangement that best complements each individual piece.
Emotional Impact Table:
| Emotion | Technique | Example |
|---|---|---|
| Awe | Strategic spotlighting | Casting dramatic shadows around delicate curves |
| Serenity | Neutral background | Highlighting serene flowing lines against a simple backdrop |
| Intrigue | Unconventional placement | Placing a sculpture in an unexpected location, sparking curiosity |
| Harmony | Thoughtful grouping based on theme or color palette | Creating a cohesive display that elicits a sense of unity and balance |
Incorporating these techniques into your glass sculpture displays will not only enhance the aesthetic appeal but also engage viewers emotionally. By thoughtfully considering lighting, background, placement, and grouping, you can create captivating arrangements that leave a lasting impression.
Remember, showcasing your glass sculptures is an art form in itself. Experiment with different approaches to find what works best for your unique creations.